Self-Sizing UITableView Cells with SwiftUI
July 20, 2020
Update (9/16/2020): iOS 14 introduces issues related to keyboard safe area insets which basically make this approach invalid - it still works if your app is built with Xcode 11, but building with Xcode 12 will cause the cell layouts whose rects intersect with the keyboard rect to break. For more information see this tweet, the developer forums post with no response, and feedbacks FB8305409, FB8240609, and FB8176223. Unfortunately, based on this, I don't think I can recommend taking this approach for writing table cells anymore, but it's still a great exercise in understanding how SwiftUI and UIKit interop work. If anything changes about this, I'll try my best to update this post with new information.
Update (9/18/2020): The issues detailed in the above update seem to be resolved as of Xcode 12.2 beta 1. I've created UIHostingControllerAvoidanceExample, which is a simpler reproduction case of the issues which existed before. However, as Nathan Lawrence details in this great Twitter thread, there are other reasons to be careful about taking this approach in production apps. I posted a Tweet with more of my thoughts on it, but if you try to embed SwiftUI content inside your table view cells, be prepared to hack around issues - they'll surely continue to crop up as SwiftUI matures.
Update (10/15/2020): Just wanted to note so this post has up to date information - the issue still happens in the Xcode 12.1 GM build. Looks like we'll have to wait until Xcode 12.2.
It's been a year since SwiftUI was released, and many iOS developers who are lucky to only support the two most current iOS versions will soon be able to start writing SwiftUI in their production apps. There are clear benefits to using SwiftUI (I could probably devote a whole post to them), but the question I've been thinking about lately is: where to start?
We won't be rewriting everything in SwiftUI, at least not yet. But are there places in our apps where we can try it out, familiarize our team with it, and set ourselves up for more investment in SwiftUI going forward?
One area that keeps popping into my head for this is UITableView cells. At work, most of our app is composed of table views managed by ReactiveLists, usually displaying lists of data models or details about a model. Lots of times we use UITableViewCell out of the box, but occasionally the cells are more complicated - we need a tertiary label, or a certain highlight state, or a custom view in the cell. Our current practice is to use XIBs for these cells, but I've been wondering whether we could start writing them in SwiftUI instead.
To test this out, I re-wrote the list cells from CIFilter.io as SwiftUI views inside of self-sizing UITableViewCells. In this post I'll talk about how to implement a self-sizing cell setup with SwiftUI, so you don't have to run into the same roadblocks I did.
Sample code for this article is available here. If you're just looking for a
UITableViewCellsubclass which you can drop a SwiftUI view into, skip to the bottom of this post 👇
Self Sizing Cells
Self Sizing UITableViewCells are a concept that pretty much every iOS developer I know has struggled with. There's an absolutely huge amount of writing online about what they are and how to configure them.
Historically, you defined the height of a table view cell using the tableView(_:heightForRowAt:) method of your table view's delegate. This works well for standard cells, but once we have cells which use dynamic data, custom views, or views whose height are dependent on their width (like labels), calculating the height up front got very complicated.
So in iOS 5, the idea of a self-sizing table view cell was introduced. If you specify UITableView.automaticDimension from tableView(_:heightForRowAt:), UITableView will calculate the cell's height based on its autolayout constraints, so you don't have to define the height yourself. This is really useful for custom cell layouts and dynamic text adjustments, and Apple even has a sample project demonstrating how to use self-sizing cells to adapt to dynamic type.
However, it can be hard to get the setup right when working with self-sizing cells. I can't count the number of times I've struggled with implementing a custom cell, then later in the table view seeing it reused with the wrong height, and trying every combination of setNeedsLayout, layoutIfNeeded, setNeedsUpdateConstraints, invalidateIntrinsicContentSize, etc to no avail. I'm pretty sure the number of stackoverflow questions about this is approaching uncountable. In this article we'll go over the correct incantation to make this setup work.
Goals
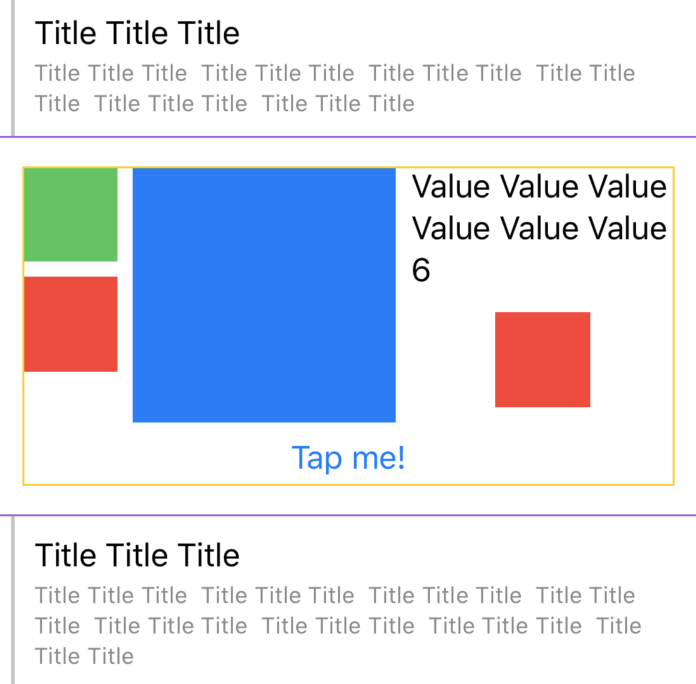
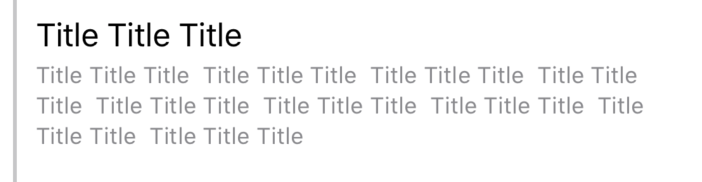
The cells we're going to look at defining in SwiftUI will demonstrate how complicated dependent cell layouts can be. We'll start with the classic example: two labels, two different font sizes, each one wrapping onto the next line if it's long enough. We'll use a string with variable number of repetitions for the text, and throw in a Rectangle to show the cell's full height, for good measure:
struct CellView: View {
    let content: String
    let numberOfRepetitions: Int

    var body: some View {
        HStack(alignment: .center, spacing: 10) {
            Rectangle()
                .fill(Color(.opaqueSeparator))
                .frame(width: 2)
            VStack(alignment: .leading, spacing: 4) {
                Text(self.content)
                    .lineLimit(nil)
                Text(String(
                    repeating: content + " ",
                    count: numberOfRepetitions
                ))
                .font(.caption)
                .foregroundColor(Color(.secondaryLabel))
                .lineLimit(nil)
            }
            .padding([.top, .bottom], 10)
            Spacer()
        }
        .padding([.leading, .trailing], 10)
    }
}
Now let's consider a more complicated cell: this one has SwiftUI layouts, views which expand to fill available space, an embedded button, and let's just throw another multiline label in there for fun!

struct ComplicatedCellView: View {
    let value: Int

    var body: some View {
        VStack {
            HStack {
                VStack {
                    Rectangle().fill(Color.green)
                        .frame(width: 50, height: 50)
                    Rectangle().fill(Color.red)
                        .frame(width: 50, height: 50)
                    Spacer()
                }.frame(minHeight: 100)
                Rectangle()
                    .fill(Color.blue)
                    .frame(minWidth: 100)
                VStack {
                    Text(String(
                        repeating: "Value ",
                        count: value % 40
                    ) + "\(value % 40)")
                        .lineLimit(nil)
                    Rectangle().fill(Color.red).frame(width: 50, height: 50)
                    Spacer()
                }
            }
            Button(action: {}, label: {
                Text("Tap me!")
            }).padding(.bottom, 5)
        }
        .border(Color.yellow)
        .padding()
        .frame(minHeight: 0, maxHeight: .infinity)
        .border(Color.purple)
    }
}
Our goal will be to correctly embed these views in cells such that:
- The cell gets its height from the layout
- The cells get properly reused with the correct height
- The table view maintains performant scrolling
sizeThatFits
Whenever I have to implement a custom self-sizing table view cell, I find myself returning to this excellent post by Douglas Hill. One approach mentioned in that article is to just override sizeThatFits and layoutSubviews in the cell subclass - this is a brute force approach, but it's the first one I tried. Let's see what this looks like when we wrap a UIHostingController that contains our SwiftUI view:
// Note: This isn't the best way to implement a hosting cell.
// See later in the post for a better method
final class HostingCell<Content: View>: UITableViewCell {
    private let hostingController = UIHostingController<Content?>(rootView: nil)

    override init(style: UITableViewCell.CellStyle, reuseIdentifier: String?) {
        super.init(style: style, reuseIdentifier: reuseIdentifier)
        hostingController.view.backgroundColor = .clear
    }

    override func sizeThatFits(_ size: CGSize) -> CGSize {
        return hostingController.sizeThatFits(in: size)
    }

    override func layoutSubviews() {
        super.layoutSubviews()
        hostingController.view.frame.size = self.sizeThatFits(bounds.size)
    }

    public func set(rootView: Content) {
        self.hostingController.rootView = rootView
        if !self.contentView.subviews.contains(hostingController.view) {
            self.contentView.addSubview(hostingController.view)
        }
    }
}
We're taking advantage of the fact that UIHostingController defines a sizeThatFits method, and we're taking that exact size and using it to manually layout the cell's subviews.
Our table view delegate method will dequeue the cell, generate a view with repetitions based on the index path, and set that view on the cell. For demo purposes, we'll put a complicated cell every 6th row:
override func tableView(
    _ tableView: UITableView,
    cellForRowAt indexPath: IndexPath
) -> UITableViewCell {
    if indexPath.row % 6 == 0 {
        let cell = tableView.dequeueReusableCell(
            withIdentifier: "HostingCell<ComplicatedCellView>",
            for: indexPath
        ) as! HostingCell<ComplicatedCellView>
        cell.set(rootView: ComplicatedCellView(value: indexPath.row))
        return cell
    } else {
        let cell = tableView.dequeueReusableCell(
            withIdentifier: "HostingCell<CellView>",
            for: indexPath
        ) as! HostingCell<CellView>
        cell.set(rootView: CellView(
            content: "Title Title Title ",
            numberOfRepetitions: indexPath.row % 20 + 1
        ))
        return cell
    }
}
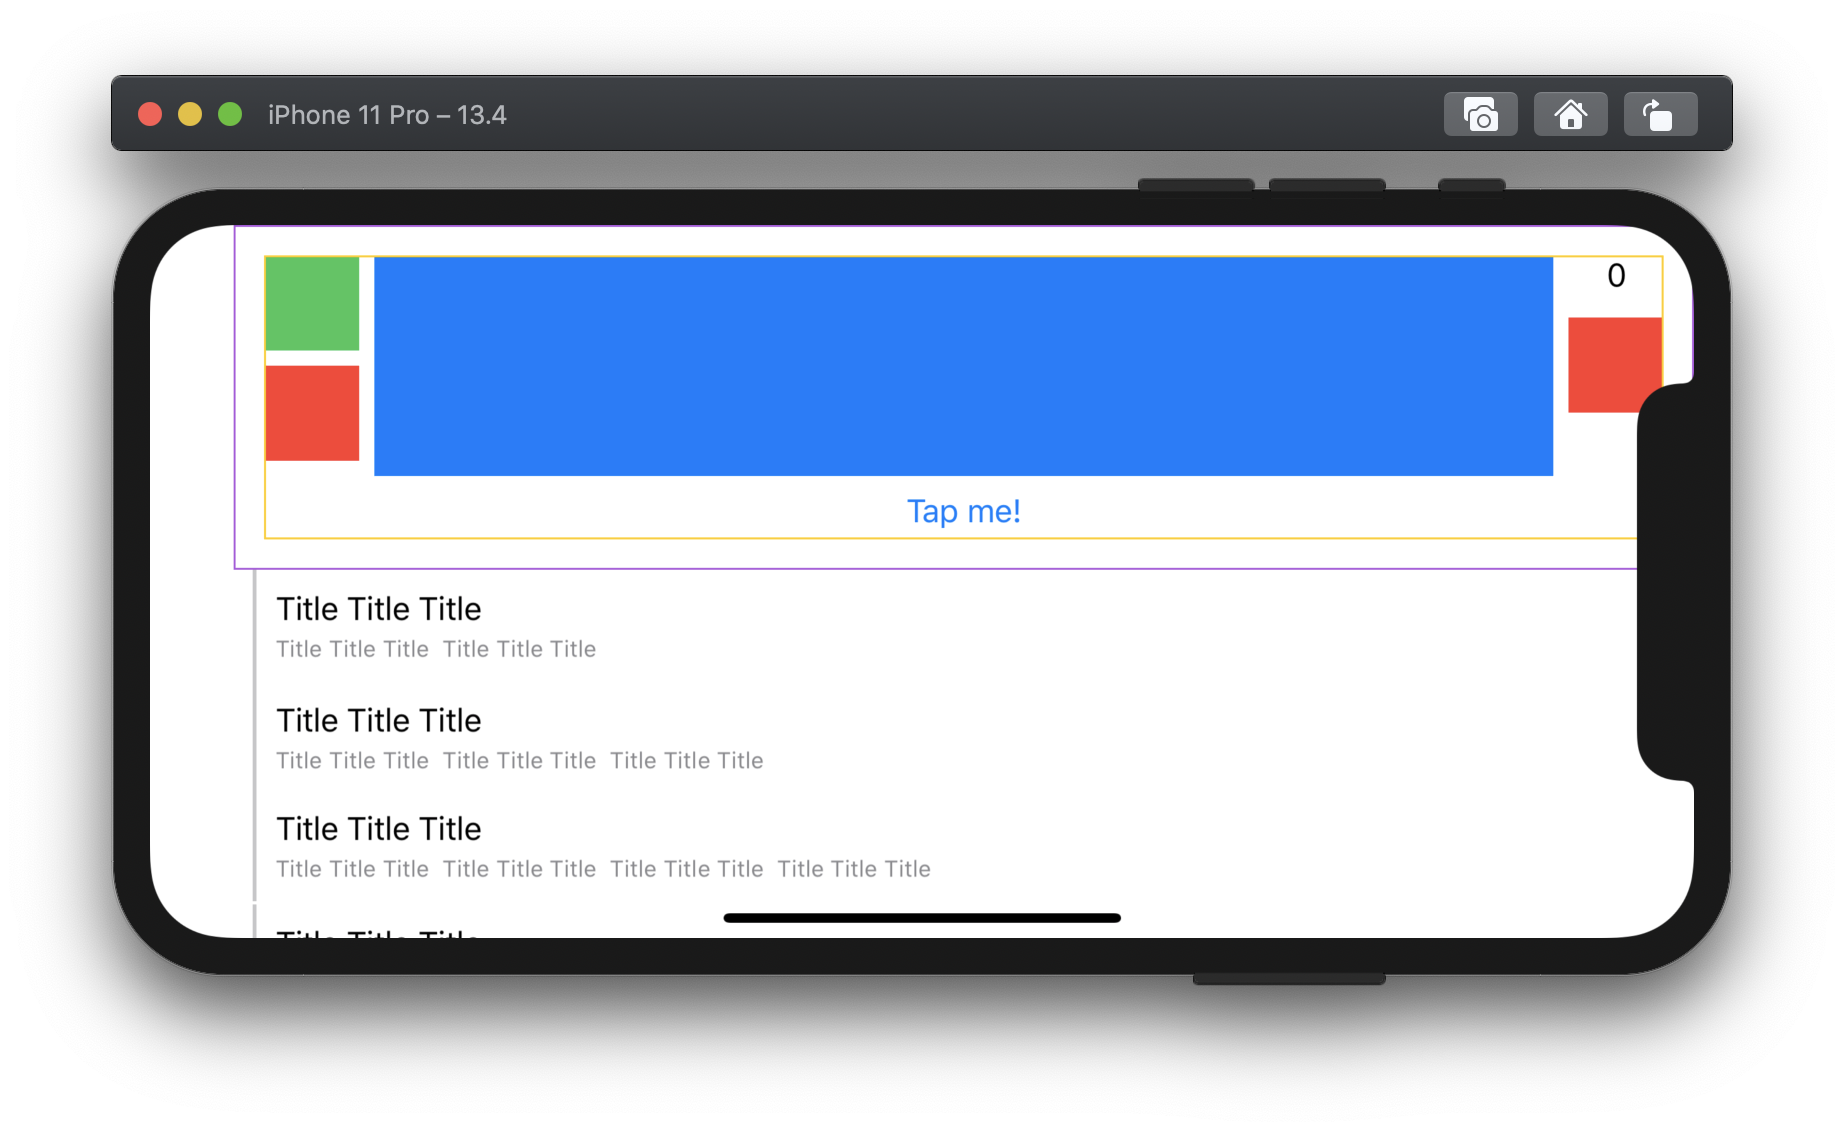
Run the app and...
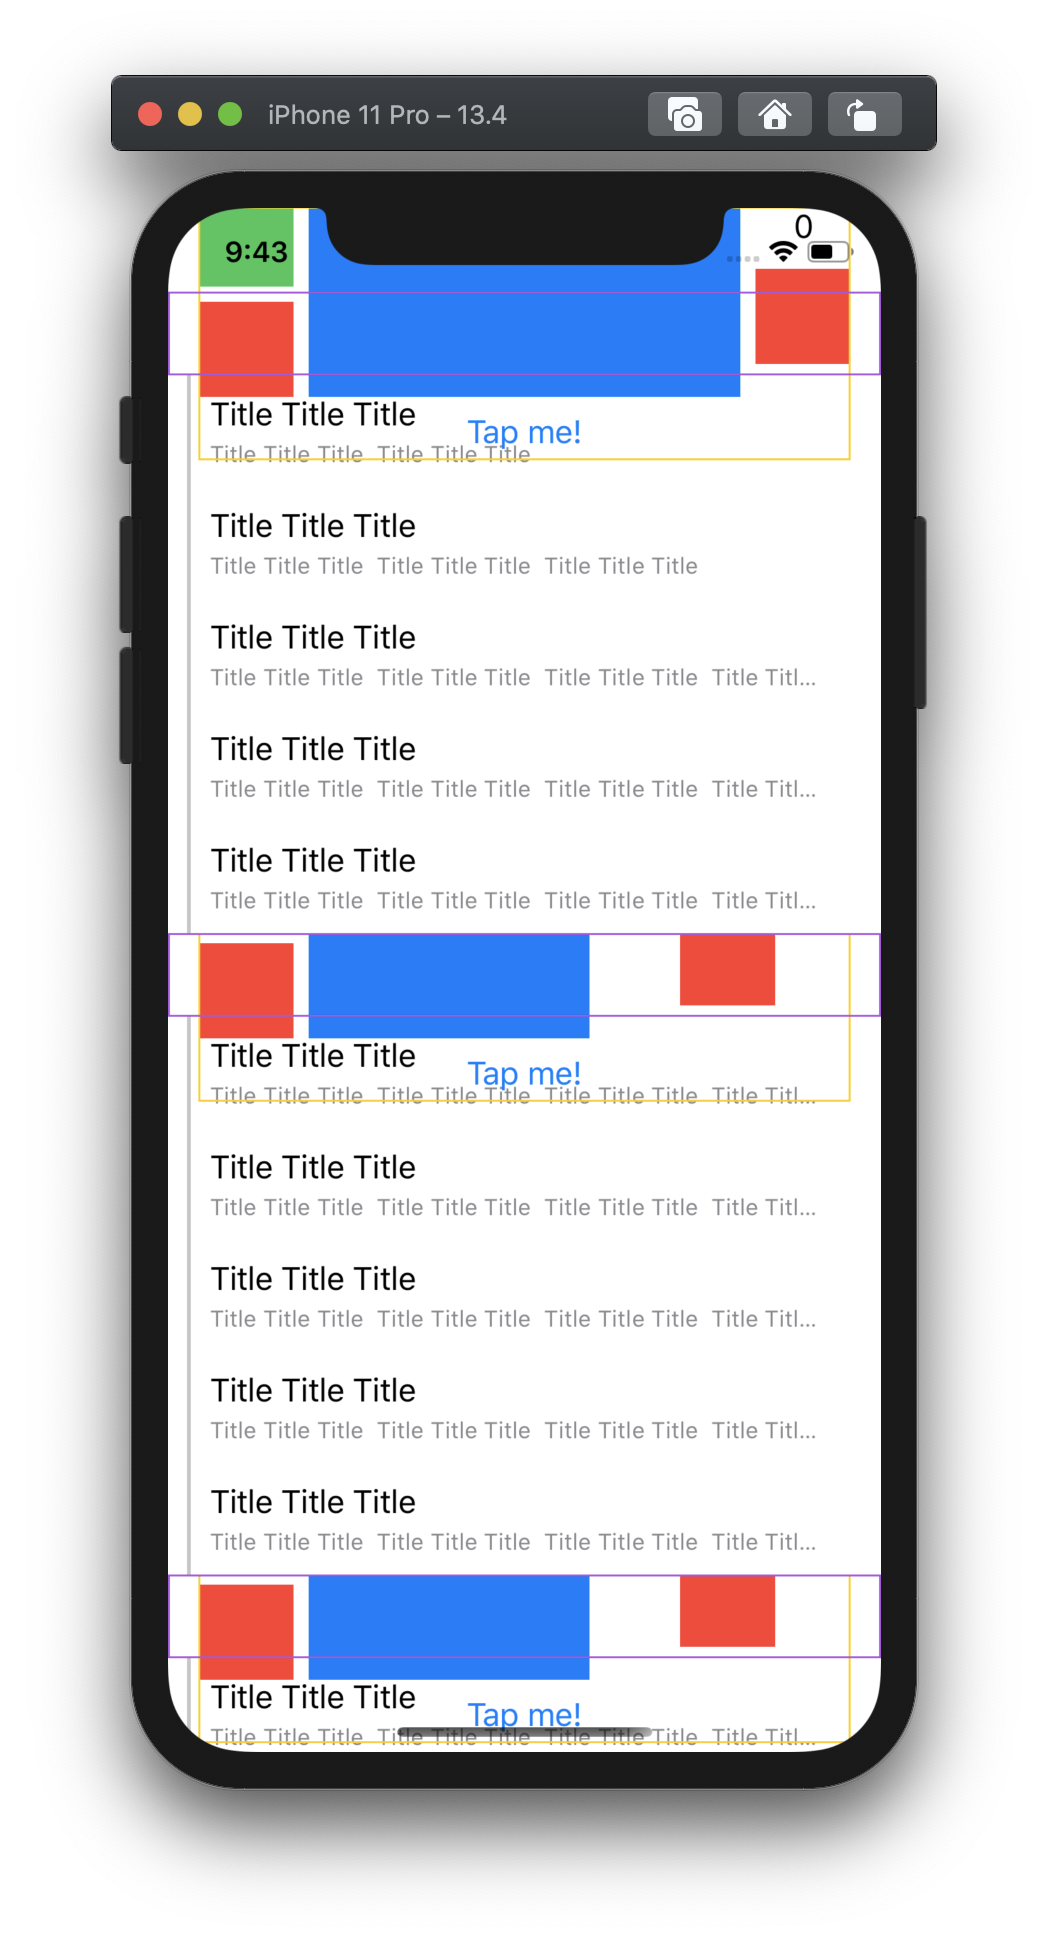
Well, that's not at all what we were expecting - the complicated cell isn't getting the height set correctly at all, and none of the labels wrap.
After a couple minutes of scratching my head about this, I realized that sizeThatFits was returning 0 for the complicated cell - which actually makes sense, since its layout (.frame(minHeight: 0, maxHeight: .infinity)) doesn't have a fixed height. To fix this, we can use the fixedSize modifier to fix the view at its ideal size in the vertical direction. After adding .fixedSize(horizontal: false, vertical: true) to both our views, we get something that looks like what we want!
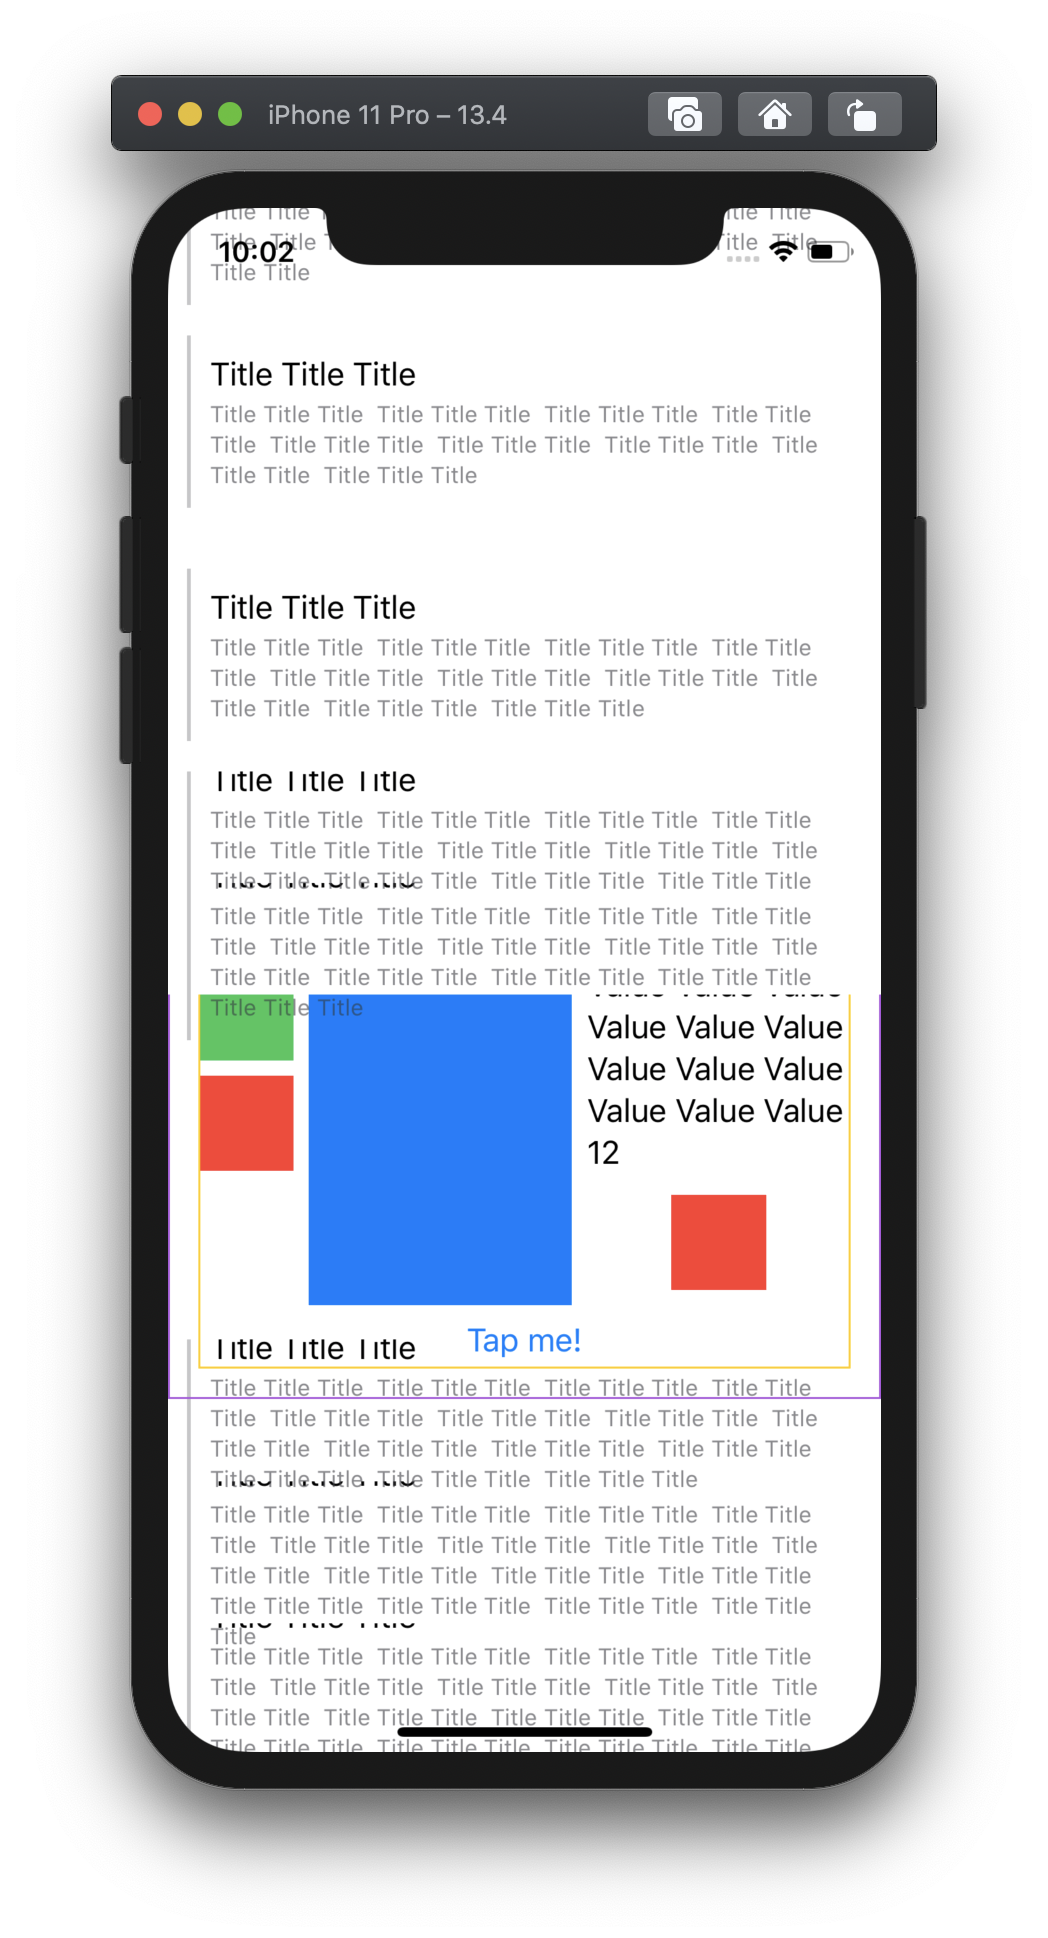
There's one last issue though: like I said, using sizeThatFits is a brute force method. It doesn't take into account any of the other things about the layout environment, like layout margins and safe area insets. In fact, if we turn the device sideways, we can see that the cell gets obscured by the notch:
At this point, I ended up giving up on this approach. It's probably possible to take safe area into account here, but it's not extensible. As we'll see shortly, there's a better way!
Autolayout
The actual recommended way to implement self-sizing cells is with autolayout, so let's try adapting our HostingCell to use constraints:
final class HostingCell<Content: View>: UITableViewCell {
    private let hostingController = UIHostingController<Content?>(rootView: nil)

    override init(style: UITableViewCell.CellStyle, reuseIdentifier: String?) {
        super.init(style: style, reuseIdentifier: reuseIdentifier)
        hostingController.view.backgroundColor = .clear
    }

    public func set(rootView: Content) {
        self.hostingController.rootView = rootView

        if !self.contentView.subviews.contains(hostingController.view) {
            self.contentView.addSubview(hostingController.view)
            hostingController.view
                .translatesAutoresizingMaskIntoConstraints = false
            hostingController.view.leadingAnchor.constraint(
                equalTo: self.contentView.leadingAnchor
            ).isActive = true
            hostingController.view.trailingAnchor.constraint(
                equalTo: self.contentView.trailingAnchor
            ).isActive = true
            hostingController.view.topAnchor.constraint(
                equalTo: self.contentView.topAnchor
            ).isActive = true
            hostingController.view.bottomAnchor.constraint(
                equalTo: self.contentView.bottomAnchor
            ).isActive = true
        }
    }
}
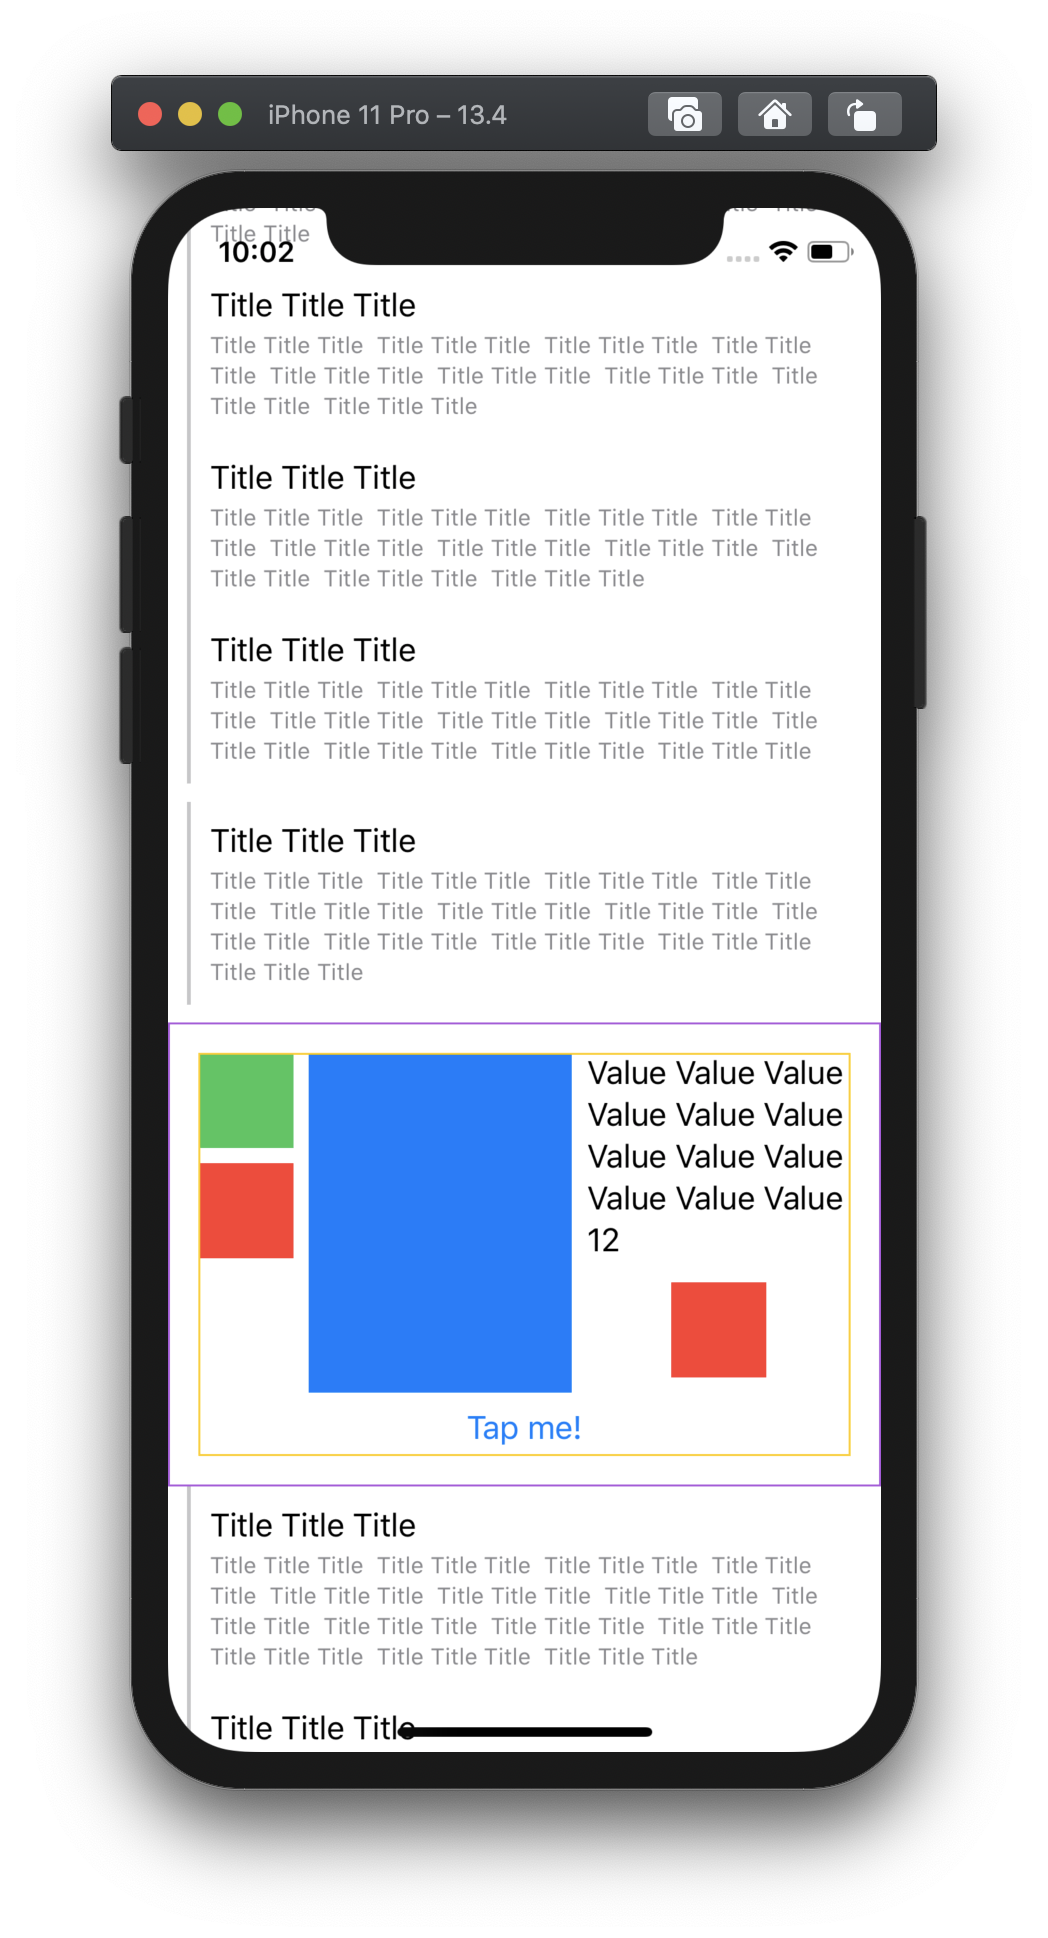
It's classic autolayout: add the view to the cell's contentView, set up constraints, and everything should work from there. The first page of cells gets the right size, but unfortunately there are some issues when the cells get reused:

If you look closely, you can actually see that each cell is reusing the height of a previous cell - the heights aren't updated on reuse. I played around with this for a while but wasn't able to figure out what was going on - then it hit me that in autolayout, the size of a view without other height/width constraints comes from its intrinsicContentSize. Turns out that setting the rootView on a UIHostingController doesn't immediately invalidate its intrinsicContentSize, so we have to make the following, magical edit which basically makes everything work:
func set(rootView: Content) {
    self.hostingController.rootView = rootView
    self.hostingController.view.invalidateIntrinsicContentSize()
    // ...
}
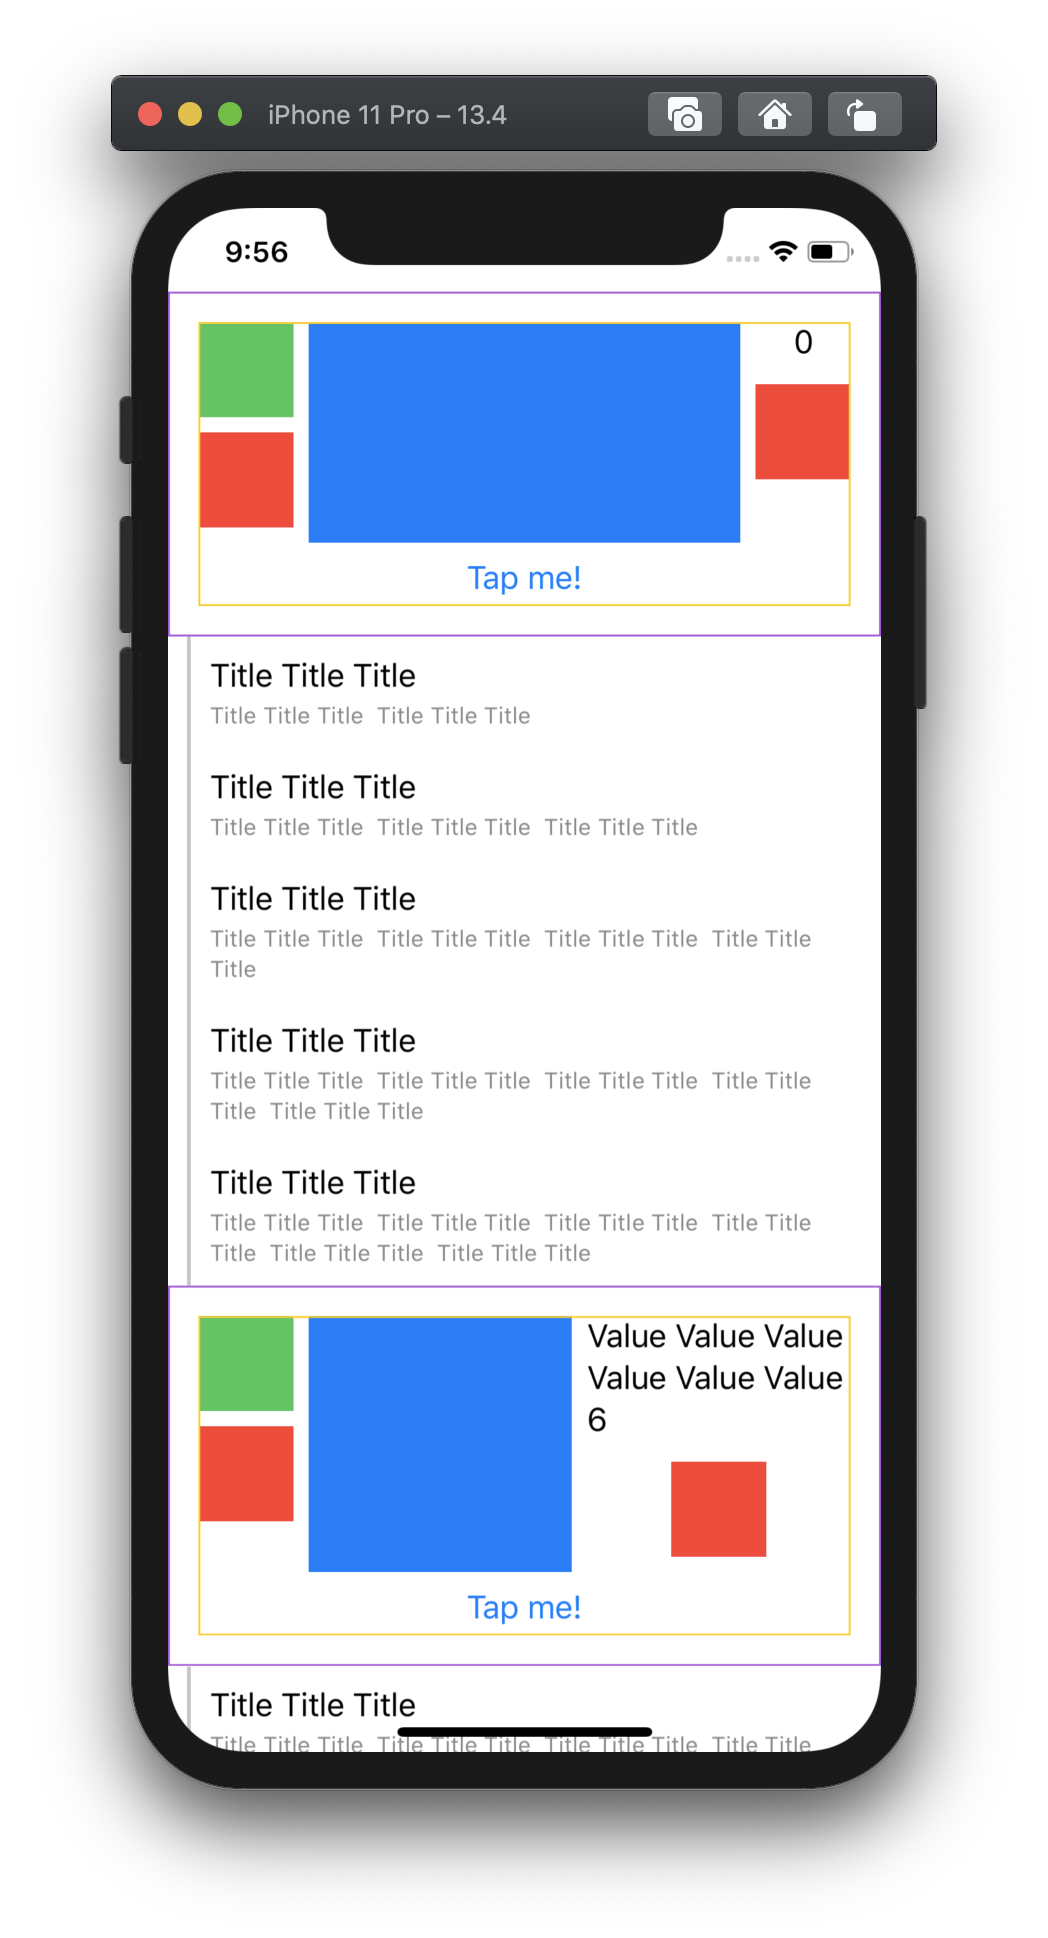
Now we've got what we want, and safe area works correctly!
(It's worth noting, also, that we don't even need the fixedSize modifier anymore - autolayout seems to use the fixed size of the view as expected.)
View Controller Containment
When implementing this for CIFilter.io, I ran into one last issue: when scrolling through the list, occasionally, I'd run across a cell with an incorrect height. Usually it would just be one cell, and the height would be almost correct, and it always corrected itself when scrolling the cell off the screen then scrolling it back on again.
This was a real head scratcher, but I asked about it on Twitter and Peter Steinberger noticed something interesting:
The code we wrote before, even though it embeds the UIHostingController's view in the hierarchy, doesn't properly add the controller as a child controller as recommended by the docs. In order to account for this, we need to make our set(rootView:) method take a parent controller as well, and do a little bit of extra work to add the child:
func set(rootView: Content, parentController: UIViewController) {
    self.hostingController.rootView = rootView
    self.hostingController.view.invalidateIntrinsicContentSize()

    let requiresControllerMove = hostingController.parent != parentController
    if requiresControllerMove {
        parentController.addChild(hostingController)
    }

    // addSubview, set up constraints, etc...

    if requiresControllerMove {
        hostingController.didMove(toParent: parentController)
    }
}
And magically, this works! When using proper view controller containment, I haven't been able to detect any incorrect sizes at all - the cell layouts just work, there are no detectable scroll performance issues. For whatever reason, adding proper view controller containment solves the issue.
Caveats
This approach has worked really well for my use case, but you can't do everything SwiftUI can do inside these cell views and expect them to work. Specifically:
- Triggering something in your view which changes its height won't update the cell's height. Regular table view rules apply: if you want to change the size of the cell, you have to hook into hook into the table view to notify that it should update.
- Updating
@Statevariables produces inconsistent behavior -@Stateupdates are persisted between cell reuse sometimes, even if your view initializer resets the@Statevariable. There might be a way to get this to work, but I haven't been able to figure it out yet - if you want to update your cells, it's best to call reloadRows.
Conclusion
At the end of the day, whether you want to take this approach to start adopting SwiftUI will be up to what you and your team are comfortable with. Hopefully this post has provided some insight into what it would take to start using SwiftUI in your table view cells so that you can make a more informed decision.
If you have any thoughts, feel free to reach out on Twitter 👋
Code
The full source code for the code samples in this article is available here.
Here's the full HostingCell code for reference:
final class HostingCell<Content: View>: UITableViewCell {
    private let hostingController = UIHostingController<Content?>(rootView: nil)

    override init(style: UITableViewCell.CellStyle, reuseIdentifier: String?) {
        super.init(style: style, reuseIdentifier: reuseIdentifier)
        hostingController.view.backgroundColor = .clear
    }

    required init?(coder aDecoder: NSCoder) {
        fatalError("init(coder:) has not been implemented")
    }

    func set(rootView: Content, parentController: UIViewController) {
        self.hostingController.rootView = rootView
        self.hostingController.view.invalidateIntrinsicContentSize()

        let requiresControllerMove = hostingController.parent != parentController
        if requiresControllerMove {
            parentController.addChild(hostingController)
        }

        if !self.contentView.subviews.contains(hostingController.view) {
            self.contentView.addSubview(hostingController.view)
            hostingController.view.translatesAutoresizingMaskIntoConstraints = false
            hostingController.view.leadingAnchor.constraint(equalTo: self.contentView.leadingAnchor).isActive = true
            hostingController.view.trailingAnchor.constraint(equalTo: self.contentView.trailingAnchor).isActive = true
            hostingController.view.topAnchor.constraint(equalTo: self.contentView.topAnchor).isActive = true
            hostingController.view.bottomAnchor.constraint(equalTo: self.contentView.bottomAnchor).isActive = true
        }

        if requiresControllerMove {
            hostingController.didMove(toParent: parentController)
        }
    }
}

Noah Gilmore
I'm Noah, a software developer based in the San Francisco Bay Area. I focus mainly on full stack web and iOS development
- 💻 I co-founded Replo, a no-code platform for e-commmerce
- ✍️ You can read technical posts on my blog
- 📱 I wrote an app which lets you create transparent app icons called Transparent App Icons
- 🧩 I made a puzzle game for iPhone and iPad called Trestle
- 🎨 I wrote a CoreImage filter utility app for iOS developers called CIFilter.io
- 👋 Please feel free to reach out on Twitter / 𝕏
