Dead Simple Dependency Injection in Swift
February 14, 2019
At the most recent Swift Language User Group meetup, Patrick Barry presented a great talk about how Lyft implements dependency injection. I'd highly recommend watching the video - I was impressed by how clean and functional the solution they came up with is. I was going to write up a summary for my coworkers, but figured I might as well put it here for the benefit of anyone who's interested.
This post describes the very simple approach to dependency injection presented in the talk, using new functions bind and mock. I'll paraphrase some code in this write up, but the concepts and function names will match the talk.
Edit (4/30/2019): This post describes a nice Swift implementation of a pattern similar to the Service Locator Pattern, considered by many to be a strong anti-pattern. Like Singletons, you should use Service Locator carefully - I've added a section at the end about drawbacks of this approach.
Dependency Injection
I won't go into detail on what dependency injection is, since there's a fair amount of time in the talk dedicated to it. Instead, let's think about an example.
Say we're writing an app to display info about cats. We would have a Cat model in our app:
struct Cat: Codable {
    let name: String
    let image: URL
}
And let's assume we have an API to fetch a cat by name:
GET /cat?id=2
{
    "name": "Maggie",
    "image": "https://placekitten.com/200/200"
}
From an architectural point of view, we want to extract this into two different parts:
- A
NetworkServicewhich makes the requests - A
CatServicewhich exposes agetCat(id:)method (this calls into the network service)

Binding
There's a clear seam between the NetworkService and CatService that we can use to test CatService. Let's extract the network's functionality into an interface:
protocol NetworkInterface {
    func makeRequest(
        url: URL,
        completion: @escaping (Result<Data, Error>) -> Void
    )
}
And the concrete implementation:
private class NetworkService: NetworkInterface {
    func makeRequest(
        url: URL,
        completion: @escaping (Result<Data, Error>) -> Void
    ) {
        // Use URLSession, etc
    }
}
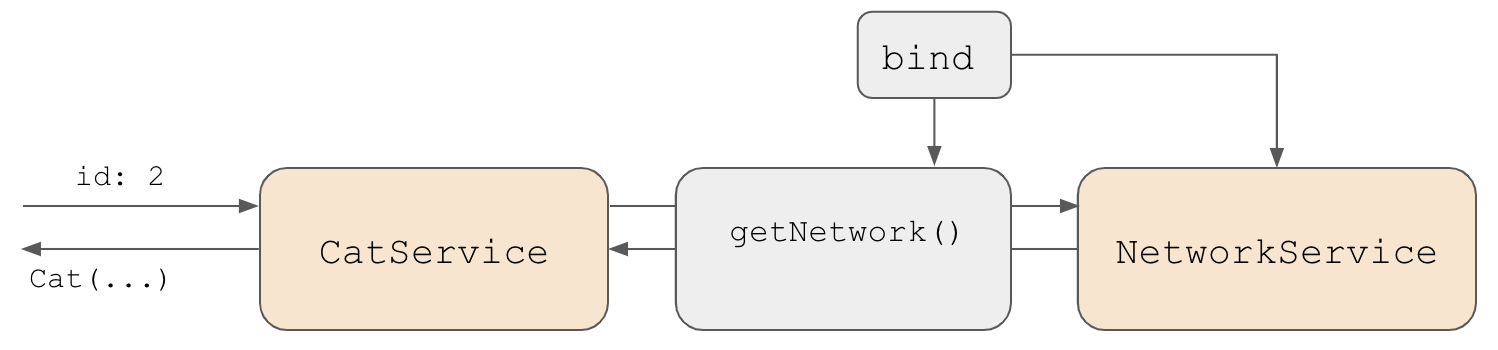
And now for the really interesting part - NetworkService will expose itself using a special function called bind (I've added the "SimpleDI" namespace here):
let getNetwork = SimpleDI.bind(NetworkInterface.self) { NetworkService() }
bind returns getNetwork as a function which can be called to get a concrete implementation of the NetworkInterface protocol. CatService can then call getNetwork to get access to the network:
class CatService {
    func getCat(id: Int, completion: @escaping (Result<Cat, Error>) -> Void) {
        let network = getNetwork()
        network.makeRequest(/* ... */)
    }
}
Implementation
Before we talk about why bind is useful, let's discuss the implementation. bind returns a function which takes no parameters and returns a type of NetworkInterface, but it also takes a closure which will be used to generate the concrete implementation.
bind's body looks like this (again, paraphrased a bit from the talk):
private var instantiators: [String: Any] = [:]

enum SimpleDI {
    static func bind<T>(
        _ interfaceType: T.Type,
        instantiator: @escaping () -> T
    ) -> () -> T {
        instantiators[String(describing: interfaceType)] = instantiator
        return self.instance
    }

    private static func instance<T>() -> T {
        let key = String(describing: T.self)
        let instantiator = instantiators[key] as! () -> T
        return instantiator()
    }
}
We take the closure that we're passed and save it in a dictionary (see end note), then return a function which accesses and calls the closure we provided. Though we have to do some force casting, we're guaranteed that the closure we need will be there when getNetworkInterface is called, since we put it into instantiators before returning from bind.
Testability
Using bind adds a level of indirection at the seam between NetworkService and CatService, which allows us to stub in a mock in tests. In order to do that, we need to define mock as well, and add a bit of more infrastructure:
private var instantiators: [String: Any] = [:]
private var mockInstantiators: [String: Any] = [:]

enum SimpleDI {
    static var isTestEnvironment = false

    static func bind<T>(
        _ type: T.Type,
        instantiator: @escaping () -> T
    ) -> () -> T {
        instantiators[String(describing: type)] = instantiator
        return self.instance
    }

    private static func instance<T>() -> T {
        let key = String(describing: T.self)
        if self.isTestEnvironment {
            guard let instantiator = mockInstantiators[key] as? () -> T else {
                fatalError("Type \\(key) unmocked in test!")
            }
            return instantiator()
        }
        let instantiator = instantiators[key] as! () -> T
        return instantiator()
    }

    static func mock<T>(_ type: T.Type, instantiator: @escaping () -> T) {
        mockInstantiators[String(describing: type)] = instantiator
    }
}
This code isn't very pretty - in fact, checks like isTestEnvironment are generally a code smell that mean you should refactor how the class works to avoid the check. However, this enables us to write tests very easily: all we have to do is set isTestEnvironment = true, and we'll be able to stub in a mock immediately using mock.
Example
Let's say we want to write a test which makes sure CatService reports an error when the underlying network errors:
class NetworkThatAlwaysErrors: NetworkInterface {
    func makeRequest(url: URL, completion: @escaping (Result<Data>) -> Void) {
        completion(.error(error: NSError(domain: "", code: 0, userInfo: nil)))
    }
}

class CatServiceTestCase: XCTestCase {
    func testCatServiceReportsError() {
        SimpleDI.isTestEnvironment = true
        SimpleDI.mock(NetworkInterface.self) { NetworkThatAlwaysErrors() }

        let expecation = self.expectation(description: "Should return error")
        let service = CatService()
        service.getCatImage(named: "Maggie", completion: { result in
            if case .error = result {
                expecation.fulfill()
            }
        })
        self.waitForExpectations(timeout: 0.2)
    }
}
bind and mock take the dirty work of setting up the DI/mocking infrastructure and hide it under the rug, allowing us to write more expressive tests easily.

Some interesting things to note:
- Many people who've worked with DI have horror stories of passing 10/15+ dependencies into an initializer so they can be mocked in tests.
bindbrings the argument count down to 0 without sacrificing testability, and makes both the service and the test more elegant. bindwill error if you forget to mock out an interface in a test, so you're never accidentally calling deeper into dependencies than you mean to.
Downsides
This approach is very similar to the Service Locator Pattern, which is commonly criticized. I really enjoyed this article about Service Locator in iOS, and there are a few downsides that I should mention:
- Using a service locator registry like
bindmeans you have implicit instead of explicit dependencies. Instead of knowing explicitly thatCatServicedepends onNetworkService, you have to look for the call togetNetwork. There's a tradeoff between the simplicity of using a service locator and the fact that it can make services with many dependencies more complex to reason about. - With
bind, it can be tough to recognize that you can update a test when a dependency of a service is removed. IfCatServicestopped calling out to the network, it's wouldn't be immediately apparent thatNetworkThatAlwaysErrorscould be deleted. This can lead to unnessary cognitive overhead in tests. - When calling
mock, you have to be very careful to set up your testing framework such that all the mocks get cleared after every test. Otherwise, you might have different behavior based on the order the tests are run, which can lead to flakes.
Conclusion
It was really interesting to see how Lyft was able to come up with such a simple solution to a complex problem. I'd really recommend watching the talk if you're interested in dependency injection and testing. If you'd like to see a working example of bind and mock, I've put one here (it has a few differences from the code in this post in order to demonstrate an actual working request and test).
Footnotes
- Dictionary is not thread safe, so if you want to use
bindandmockon multiple threads you'll need to implement something similar to an atomic box (the talk mentions this). - "Seam" is a concept that seems to have been first coined in Working Effectively With Legacy Code. It's defined as "a place where two parts of the software meet and where something else can be injected".
- You could even put
mockin your test target to make sure it can't be called in production!

Noah Gilmore
I'm Noah, a software developer based in the San Francisco Bay Area. I focus mainly on full stack web and iOS development
- 💻 I co-founded Replo, a no-code platform for e-commmerce
- ✍️ You can read technical posts on my blog
- 📱 I wrote an app which lets you create transparent app icons called Transparent App Icons
- 🧩 I made a puzzle game for iPhone and iPad called Trestle
- 🎨 I wrote a CoreImage filter utility app for iOS developers called CIFilter.io
- 👋 Please feel free to reach out on Twitter / 𝕏